
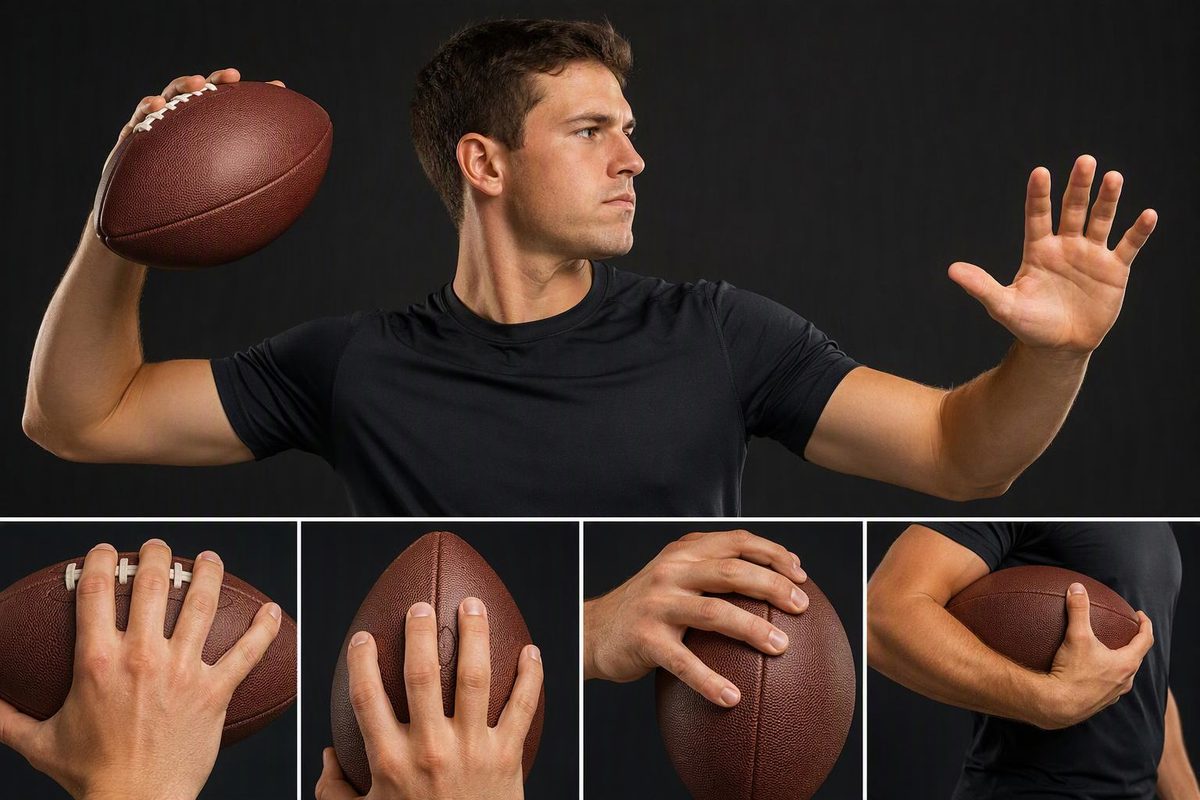
To throw a football, spread your fingers around the ball, use the laces for control and leave a small pocket between your palm and the leather. To run with it, cover the front tip and clamp the ball against your forearm, upper arm and chest. A throwing grip allows a clean release; a carrying grip keeps the ball secured against your body.
Choose throwing, carrying or traffic to see the hand-placement checks for that job.
Grip Check by Assignment
Choose a listed assignment to see its grip check.
Throw: Fingers Support the Ball
Start with the ring and little fingers on the laces, the index finger toward—but not on—the tip, and the thumb opposite. Leave a small palm pocket.
- Check for a comfortable spread, not a clenched hand.
- If the player keeps resetting the grip, test one finger adjustment at a time.
- Lace placement can vary with comfort and hand size. Check younger players’ ball size before blaming technique.
- A wobbling pass calls for a grip and release check, not an automatic grip change.
Carry: Cover the Tip, Clamp the Ball
Close the hand around the front portion and secure the ball against the body.
- Check fingers, palm, forearm, upper arm and chest.
- Exposed tip: reset the hand.
- Open elbow: re-clamp the rear portion.
- Swinging arm: restore chest contact.
Traffic: Reinforce the Existing Tuck
Add the free hand before entering congestion without opening the carrying arm.
- Keep all five carrying contacts: fingers, palm, forearm, upper arm and chest.
- If the elbow opens or the ball leaves the chest, reset before repeating.
- Rehearse with a verbal “traffic” call; this no-contact check does not include strips or tackling.
Sources: USA Football grip guidance; NFL FLAG throwing guide; VIQTORY five-point ball-security guide, linked in the article. Corrections are coaching cues, not measured outcomes.
For high school and small-college position periods, teach the hand placement first, then check whether it stays intact during movement. A player who can demonstrate the grip while standing still has shown the starting position—not yet the ability to keep it through a throw, a catch or a run.
Hold the Football With Your Fingers to Throw
Use this starting grip for either throwing hand:
- Turn the laces toward your fingers. Start with the ring and little fingers across the laces.
- Spread the other fingers comfortably. Place the middle finger near the white stripe, if present, and the index finger between that area and the pointed end—not directly on the tip.
- Set the thumb on the opposite side. Let it support the ball without forcing an uncomfortable stretch.
- Leave a small pocket under the palm. Hold primarily with the fingers rather than burying the ball in the hand. Keep the grip firm enough to control the ball, but not clenched.
These cues follow USA Football’s grip guidance, which recommends the last two fingers on the laces, an index finger toward the nose and space beneath the palm.
The pocket is a hand-placement cue, not an instruction to hold the ball loosely. The fingers still need to control it. If a player creates space beneath the palm but cannot keep the ball settled, adjust the finger placement rather than insisting on a larger gap. The supplied guidance does not specify a measured palm-pocket size.
Check the grip from the finger side and the thumb side. From the finger side, look for a comfortable spread rather than fingers crowded together. From the thumb side, check that the player is supporting the ball without stretching the hand into an awkward position. Ask the player to show the grip again after an easy throw; that makes repeated repositioning easier to spot.
Lace Placement Is a Starting Point, Not a Fixed Pattern
Do not require identical lace positions from every quarterback. Hand size and comfort affect the fit. NFL FLAG’s throwing guide treats the number of fingers on the laces as a preference and recommends testing different grips in practice.
Use the ring-and-little-finger placement as the first demonstration, then let the player find a comfortable variation. Change one detail at a time so the player can identify what feels different. Moving every finger at once makes it harder to judge whether an adjustment helped.
Before the throw, look for relaxed fingers and a visible palm pocket. If the player repeatedly adjusts the ball, test a slightly different finger position. With younger players, check that the ball is age-appropriate before treating the problem as a technique failure; USA Football makes that distinction in its grip guidance.
Do not turn the inspection into a contest over who can stretch farthest around the ball. The useful question is whether the player can establish a comfortable grip, control the ball and repeat the placement without constant correction. A forced grip is not a better grip simply because it matches the coach’s demonstration.
Test the Grip With Easy Throws, Not Maximum Distance
Keep the initial test short and comfortable. Judge control and repeatability, not distance. Watch the hand before the throwing motion and again when the player receives the ball for the next repetition. That separates difficulty finding the grip from difficulty using an established grip.
A wobbling pass is a reason to inspect the grip and release—not proof that the grip alone is wrong. If the hand placement looks comfortable and repeatable, do not keep moving the fingers solely because the pass wobbles. Continue the check into the release with the football passing progression.
Give a correction the player can act on before the next throw: spread the fingers, move the index finger away from the tip, or restore the palm pocket. Avoid combining several corrections into a single instruction. The next easy throw should test the change you just made.
Cover the Tip and Clamp the Football to Run
For running backs, receivers, tight ends and quarterbacks who have committed to running, teach “cover the tip, clamp it high and tight.” The ball belongs against the body, not hanging in the hand beside the hip.
Use five contact points as a check:
| Contact Point | Observable Cue |
|---|---|
| Fingers | Cover the front tip; do not leave it exposed. |
| Palm | Close the hand securely around the front portion of the ball. |
| Forearm | Seat the ball along the inside of the forearm. |
| Upper arm | Close the elbow so the rear portion stays secured. |
| Chest | Press the ball against the torso rather than swinging beside it. |
This is the five-point framework described in VIQTORY’s running-back ball-security guide. That guide also recommends covering the ball with two hands in traffic.
Teach the tuck as a connected position. Covering the tip does not finish the job if the elbow stays open. Closing the elbow does not finish it if the ball hangs away from the chest. Work through the contact points until the player can show the whole position without rebuilding it at every checkpoint.
Have the player show the tuck in each arm before moving. Inspect the front tip, then the rear portion and body contact. This gives the coach a consistent sequence and keeps the correction specific. If the tip is exposed, reset the hand first; if the rear portion is loose, close the elbow and restore the clamp.
Change the Palm Cue When the Assignment Changes
The palm cue changes with the assignment: leave a pocket when throwing; close the hand around the ball when carrying. Do not carry over the quarterback’s palm-pocket instruction into a ball-security drill.
A quarterback who has committed to running needs the carrying tuck, not merely a throwing grip held closer to the chest. During a controlled rehearsal, make that change visible: establish the hand around the front portion, seat the ball along the forearm and close the carrying arm against the torso.
The distinction also matters when correcting players. “Get it out of your palm” belongs to the throwing-grip check. “Close your hand around it” belongs to the carrying check. Name the assignment before giving the cue so the player is not asked to satisfy conflicting instructions.
Add the Free Hand Without Opening the Carrying Arm
Before entering congestion, teach the free hand to reinforce the tuck without opening the carrying arm. The second hand adds coverage; it should not replace the forearm, upper-arm and chest contacts already established.
In a no-contact drill, use a verbal “traffic” call. Watch the original carrying arm as the free hand arrives. If the elbow opens or the ball moves away from the chest, reset the tuck and rehearse the addition again. A player can appear to have both hands on the ball while losing the underlying carrying position.
Do not use the traffic cue as permission to start stripping the ball during this progression. Its purpose here is to rehearse the change in hand coverage while preserving the tuck. Contact work is outside this suggested period.
Secure the Catch Before Accelerating
For receivers, make “catch, tuck, run” the instruction in a controlled drill. Finish securing the catch before accelerating. Add that checkpoint to your wide receiver drill progression.
Inspect the transition rather than only the final pose. A receiver may show a good tuck at the finish while leaving the ball away from the body during the first movement after the catch. Slow the rehearsal enough to see the hand cover the tip and the carrying arm establish body contact.
If the receiver begins running before the tuck is complete, repeat the catch-to-tuck sequence under control. The correction is not to hold every catch in a stationary pose during play. It is to make the securing action clear and repeatable before asking the player to perform it faster.
Once the player can complete that transition, check that the tuck survives movement. The same inspection applies as for a running back: covered tip, closed hand, forearm support, closed elbow and chest contact.
Use an Eight-Minute, No-Contact Grip-and-Tuck Period
For this suggested progression, give each pair one ball and a 10-yard lane marked by two cones. Leave at least three yards between parallel lanes. It is a no-contact technique period: no punches, strips or tackling. The timings and repetition counts below are a practice design, not a measured guarantee of improvement.
| Time | Assignment | Coach’s Check |
|---|---|---|
| Minutes 0–2 | Static grip and tuck | Palm pocket; five carrying contacts |
| Minutes 2–5 | Short passes | Comfortable, repeatable grip |
| Minutes 5–8 | Moving tuck | Contacts stay intact while jogging |
Minutes 0–2: Show Both Positions Before Moving
Each player shows the throwing grip, then the carrying tuck in each arm. Partners check the palm pocket for throwing and all five contact points for carrying.
Keep the assignments separate. Have the player finish showing the throwing grip before changing to the tuck, rather than blending the two demonstrations. Ask the partner to identify the contact that needs correction instead of offering a general “hold it tighter.”
Minutes 2–5: Make Short Passes With One Adjustment at a Time
Partners stand five to seven yards apart. Each player makes eight easy throws. Adjust one grip detail at a time; do not chase maximum velocity.
Watch whether the player returns to the same comfortable placement between throws. If the grip changes constantly, pause and re-establish the starting fit. If the grip repeats but the pass still wobbles, inspect the release rather than assuming another finger adjustment will solve it.
Minutes 5–8: Keep the Tuck Through Movement
Each player completes four 10-yard jogs, two with each carrying arm. On the coach’s “traffic” call, add the free hand without loosening the tuck. Freeze at the finish for inspection.
Watch during the jog as well as at the freeze. The finish makes the contacts easy to inspect, but the movement shows whether the ball swings away from the torso or the elbow opens along the lane. Correct the point that breaks down, then require a clean repetition before increasing speed.
Correct the Contact You Can See
Use visible errors to choose the next instruction. An exposed tip means reset the hand. An open elbow means re-clamp the rear of the ball. A swinging carrying arm means restore chest contact. For throwing, a buried palm means re-establish the finger-supported grip and its small pocket.
After the correction, have the player repeat the same task before adding difficulty. A static adjustment needs a static recheck; a tuck that failed during a jog needs another controlled moving repetition. That keeps the assessment tied to the problem rather than to how convincing the player’s final pose looks.